Category Archives: Computers

Menyambungkan tulisan blog ke Facebook

Untuk menampilkan tulisan blog kita agar masuk ke facebook status ikuti langkah berikut

1. Temukan rss dari blog.binusian.org biasanya alamatnya sebagai berikut:

http://username.blog.binusian.org/feed/rss

Untuk blog saya seperti di bawah ini misalkan:

http://cahpct.blog.binusian.org/feed/rss

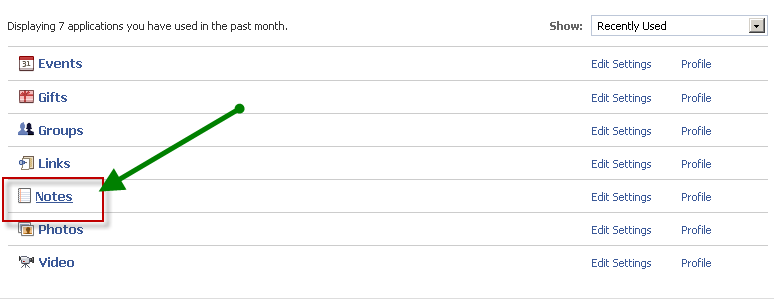
2.  Pilih menu application setting

1

3. Selanjutnya Click notes:

8

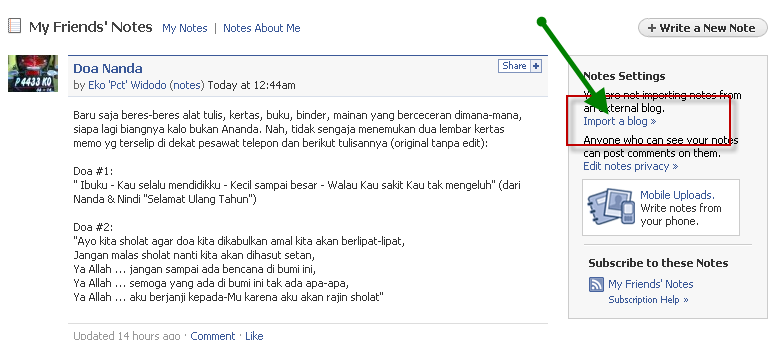
4.  Pilih menu Import a blog

72

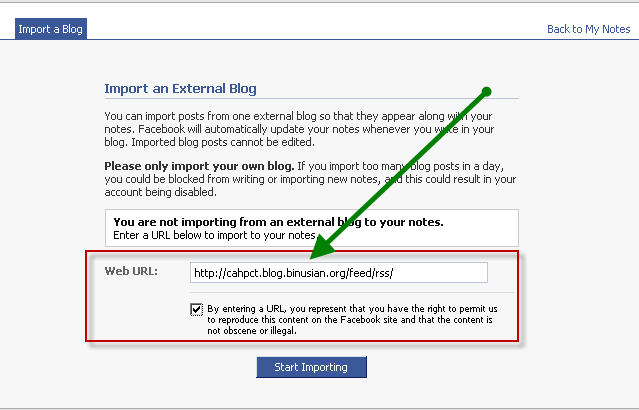
5. Masukkan url yang ingin di import ini berarti rss yang tadi kita tuliskan atu copy dan paste di dalamnya:

9

5. Selanjutnya pilih Start Importing:

6.  Pilih Confirm Import

5

Maka setiap anda menulis blog maka akan tertarik di facebook kita dan orang lain akan membacanya dari status ataupun dari notes yang terletak di menu profile sebelah kiri.

6

Mp3gain menormalkan file MP3

mp3gainDisaat kita menikmati ataupun menjalani hari akan lebih nyaman dan membahagiakan apabila di ikuti oleh lantunan musik yang bisa di dengarkan dengan suara yang merdu dan tidak memekakkan telinga atau bahkan suara yang tidak jelas dikarenakan level volume file mp3 yang ada tidak standar.

Program mp3gain adalah salah satu program untuk menormalkan suara file mp3 , dengan program ini kita bisa menormalkan, meninggikan , menganalisa suara mp3 kita tanpa harus mengkoding dan encoding tinggal memasukkan file ke dalamnya untuk lebih detail cara kerjanya bisa di lihat langkah- lankah sebagai berikut Lanjut baca

Try Post2Blog

postThis morning I try post via new software that I had installed yesterday. The software called Post2Blog it is the other way posting without login to the administrator area in my blog. Is most easier and also have good performance like Microsoft words. My first post is very easier and fast and this software very helpful to post to our blog.

You can find the software in their official web and this software actually free to use without pay any dollar in there. This is the site link to download this software Post2Blog. Let’s get post to blog now.

Im2 Broom My internet Connection

images1 For long time I have plans to get internet connection in my dormitory house and sometime for mobile needed. And In middle of january 2009 I decided to find new modem and also the connection. I go to the plaza semanggi to accompany my friend for bought a new starter pack indonsat IM2  broom for his new nokia I not remember their HSDPA type of handphone. And when I come to the IM2 center in first floor of semanggi mall my friend bought the starter and after a minute review I also interested fo buy the new one. And after back at my dormitory  I’m  go to Ratu Plaza to find new modem HSDPA. I decided bought vodafone modem and activate my IM2 modem card take 5 to 10 minute. I think it is very simple. For browshing and chatt  that’s enough for me but for download sill slow. For this  this time is  quite better than the other starter pack that already I used before..

Repository link for centos

Today i find some reposotiry for update the centos operating system in my server, because yesterday when I yum upadate my server take  long time because the repositry server in broad country. And today I searching the mirror server in indonesia for faster update I found this site.

For Indonesian CentOS user who search for fast IIX (Local) Repo to update ver.5.2 including x86_64, you could point your repo to

1. http://mirror.lintaswave.net.id/centos/ .

2. http://kambing.ui.edu/centos/

Let’s update now!

Install LDAP Plugin in WordPress WP-MU

Simple think to do when our wordpress WP-Mu want to be connected to LDAP server authentication. Simple but make me headcahe, I need few time to found this. About one month I was explore in the  internet also try develop it so difficult brother. Finally  yesterday I got from the sourceforge.net the  plugin developed by Aaron chunk.

Ok let’s start to install it just follop this instruction:

1. Download the plugin Download

2. Extrac it into ->> /public_html/wp-content/mu-plugins/ (depend on your wpmu folder)

3. Setting from the browsher WP-Mu admin.

That’s all Quite simple brother.

Ngakalin Kaspersky Anti virus blacklist

Dah beberapa lama ini aku cari-cari antivirus yang ampuh sulit banget sampai  data kolaps di serang virus. Nyoba  kaspersky lumayan bagus, tapi sayang lisencednya tidak  bisa karena di blacklist sama server mereka harap maklum  hasil gratisan. Tapi perjuangan belum  nyerah kalau kata pepatah “berjuang sampai titik darah penghabisan”, selanjutnya mencarilah cara untuk ngakalin biar kaspersky biar bisa di pakai lagi . Yuk di simak gimana caranya:

  1. Download program Patch KAV.
  2. Silahkan masuk ke KAV Control Panel => Pilih menu Settings => Klik Service => dan matikan pilihan Self Defence [uncheck].
  3. Hapus semua Key yang terdaftar pada KAV Control Panel.
  4. Keluar dari KAV Control Panel dengan cara klik kanan pilih exit pada Taskbar Icon Tray KAV [yang berada di pojok kanan bawah].
  5. Copy-kan program Patch KAV ke dalam folder KAV. [biasanya di C:\Program Files\Kaspersky Lab\]
  6. Tekan tombol Clean pada program Patch KAV tersebut.
  7. Lalu klik Patch Kaspersky Antivirus.
  8. Keluar dari program Patch KAV.
  9. Kemudian nyalakan kembali KAV Control Panel, lalu centang kembali Self Defence dan masukkan Key baru.
  10. Sekarang tidak perlu khawatir, apakah akan diblacklist atau tidak, karena sudah dipatch

Setelah aku coba lakukan itu jalan and bisa deteck virus terbaru … mungkin ada teman yang mau or perlu bantuan silahkan contact I or just send u comment.

Lost Password in Linux Centos

Boot from cd rom using dvd centos installation and write “linux rescue” enter the following  command until mount file image “chroot /mnt/sisimage/

Edit /etc/shadow to remove

if you can do this, just type “passwd” once you are in and change it to whatever you like. Or just edit /etc/shadow to remove the password field: move to just beyond the first “:” and remove everything up to the next “:”. With vi, that would be “/:” to move to the first “:”, space bar once, then “d/:” and ENTER. You’ll get a warning about changing a read-only file; that’s normal. Before you do this, /etc/shadow might look like:

root:$1$8NFmV6tr$rT.INHxDBWn1VvU5gjGzi/:12209:0:99999:7:-1:-1:1074970543
bin:*:12187:0:99999:7:::
daemon:*:12187:0:99999:7:::

adm:*:12187:0:99999:7:::

and after, the first few lines should be:

root::12209:0:99999:7:-1:-1:1074970543
bin:*:12187:0:99999:7:::
daemon:*:12187:0:99999:7:::
adm:*:12187:0:99999:7:::
You’ll need to force the write: with vi, “:wq!”.

write “Exit’. system automatically restart.